Sunday, March 27, 2011

A few test plants.

We added the fish today and I couldn't help myself. I had to put a few plants in just to give it a try. I want to compare how they do in the system compared to the ones in soil waiting to go outside. I only added enough lighting to the system for the 8 plants I am testing. I had to lower them a lot to get them where they needed to be for these seedlings. I will get the rest of the lighting installed next weekend and check the system to see how its doing.


Fish Day

I picked up an API 5 in 1 water test kit. This kit allows me to test PH, Nitrate, Nitrite, Carbonate and General Hardness by dipping 1 little strip in the water. I will test once a week and keep a log of levels.


After checking the levels and making sure everything was ok to add the starter goldfish we added 50 small goldfish we picked up from the pet store. They are really cheap and only cost about $5.50 for all of them. I added 10 at a time and spread it out over a couple hours to watch and make sure there were no problems. Just in case some started dying for some odd reason I wouldn't lose the whole batch. Below are some pictures of the fish in the bag from the store and then sitting in the tank getting acclimated to our water temperature.


And below the happy fish in there new home. They are on the small size compared to this tank so they are a little hard to see. I also added some large river pebbles from an established tank we have. I think this will help get things going in the system.


Saturday, March 26, 2011

Hydroton in and ready for fish and plants.

Got the hydroton from a local store called The Green Thumb. Some really nice guys there. They were very helpful and even have some hydroponic systems up and running in their store. They have a really cool Geodesic dome green house behind their shop as well. I hope to go back and pick up a couple of the lighting systems they had for sale.

Well here is a shot of the hydroton in the solo cups and waiting to be planted after the tank cycles with fish.

Below I thought I'd throw in a shot of the tank I am setting up that will be part of a grow bed system and possibly have a raft system right on top of the water instead of putting on a lid.

This shows the water returning to the tank looks like its creating a pretty good amount of oxygenation by itself. 

New NFT water inlet system

I had to come up with another water inlet for the NFT system. The 1/8 inch barb and tubing were just not going to allow the water flow from the pump installed and would have looked like a small trickle through the system. I came up with a simple way to do it with all 3/4 inch pvc pipe. Just took a few T's and some cutting and it works perfect. Each tube in the NFT system is getting the same level of water flow and height in tube.

Here is the design. Very simple but effective.


Here it is installed and all joints cemented.


Here you can see how much water is moving through each one of these inlet tubes.


I also added a valve to regulate the flow of water from pump if needed. Right now wide open seems to be fine.

Custom made mount for water heater.

The heater I have was not able to be attached to the side of tank. It is made to attach to much smaller side of a fish tank. I went about making a custom mount for the heater and then attached it to the side of the frame on the NFT system and dropped it down to the level it needed to be at. I really hope this will get the temperature up to around 70 degrees. It was reading just under 60 when I put the thermometer in before installing the heater.

Used a little caulking to attach the heater to the wood. 

 Here the finished heater mount is attached to the side of the NFT sytstem frame.


Air stone and fish playground added.

 Just figure the fish will like a place to hide or just hang out and I'm sure the extra air will be good for the system.

Added large Air stone for better oxygen.


Below I added some left over pieces of pvc and a large terracotta pot for a nice little fish playground.


Thursday, March 24, 2011

Seedling update

Ok the addition of grow lights has definitely made the seedling stalks thicken up and they are looking much better now. I transplanted to tomatoes from the Jiffy starting trays to cups. They were all buried  up to their first set of stems. This will allow the part of the stalk buried to start growing roots all over it. When I go to put them in the ground I will have a much better root development. This will give me stronger healthier plants outside. Some of these will be going into the Aquaponic Basement Garden system as well. I am anxious to compare what I grow outside to what grows in the Aquaponic system. I am going to give it another 2 weeks before I start planting outside in my raised bed garden. I will also be experimenting with Straw bale gardening this year. I am excited to see how that works.


Thursday, March 10, 2011

Seedlings a little leggy hopefully they will thicken up.

Most of these will be for my outdoor garden but some will make it into the Aquaponic Basement Garden. Looks like it will be 2 weeks at least before I get the setup finished. Have an archery 3d shoot this weekend. Can't wait to get this thing up and running.

Tuesday, March 8, 2011

Great deal on a 110 gallon container for the fish!

Thanks to a buddy of mine I found a great deal on a 110 gallon stock tank at Tractor Supply. This tank is perfect size for my aquaponic system. It has a lot more room than that 55 gallon glass aquarium. It is meant to be a livestock feeder. They only had one in stock so I will wait till they get another in and pick up a second. At only $49.00 I couldn't do better. Now to find a pump and finish getting this thing set up. One step closer to completing my Aquaponic Basement Garden NFT system. Thanks for the advice I have been getting from everyone and my buddy Kris for the link to Tractor Supply.

Monday, March 7, 2011

Going shopping after work!

I will be finding some large plastic totes to use as my tanks and I need to find a good pump. I think 1000 gph should do the job. If  you have a suggestion please comment.

Sunday, March 6, 2011

Aquaponic Basement Garden Day 2

Well I woke up with a horrible sinus headache and fever today. I did finally get motivated to do a little work today though. It wasn't much but I tapped and threaded the PVC feeder line and installed the barbs. I then connected the 1/8 inch tubing to the barbs and ran the tubing into the 4 inch PVC rows. Here are pictures of how it came out.

Saturday, March 5, 2011

Aquaponic Basement Garden Day 1

Got a pretty good bit done. Not as much as I would have liked but I'm not disappointed. Since this is my first build I'm having to learn as I go. The frame came out nice I still need to do some bracing it feels a bit shaky from left to right. I was very pleased the way the PVC work came out. I think I'm going to run the 4 inch PVC platform for right now. After everything is set up and I get the hang of things I will add the 4 rows of 3 inch PVC to the lower platform. Pretty pleased with the cost too on this project. Lumber was about $25.00 and all the PVC, tubing, connectors, elbows, screws, and miscellaneous stuff ran another $65.00. I am attempting to use a 55 gallon tank we used to keep pet fish in. Now that the frame is built though I am thinking of taking it out and using some large plastic storage bins. I have some around the house that are pretty large. If they aren't big enough I saw some that were about 100 gallon at Big Lots that were rather cheap. I can get 2 of them in there and should allow me to keep different size fish in each one. I think I can safely keep 125 Tilapia in 2 tanks this size. Well enjoy a few pictures from today's work.

Frame is built! Tank in place! Headed to store for PVC tubing.

The frame is built. I think it came out pretty good. I have the tank in place and filled with water. I need to go to Home Depot and pick up my PVC tubing and connectors. Hopefully by the end of the day the system will be roughed in. I will post some pictures later. Off to the store now!

Thursday, March 3, 2011

Beginning my Aquaponic Basement Garden

This site has been started to document my journey into Aquaponics.

Definition for Aquaponics from Wikipedia: Aquaponics (pronounced: /ˈækwəˈpɒnɨks/) is a sustainable food production system that combines a traditional aquaculture (raising aquatic animals such as fish, crayfish or prawns in tanks) with hydroponics (cultivating plants in water) in a a symbiotic environment. In the aquaculture, effluents accumulate in the water, increasing toxicity for the fish. This water is led to a hydroponic system where the by-products from the aquaculture are filtered out by the plants as vital nutrients, after which the cleansed water is recirculated back to the animals. The term aquaponics is a portmanteau of the terms aquaculture and hydroponic.

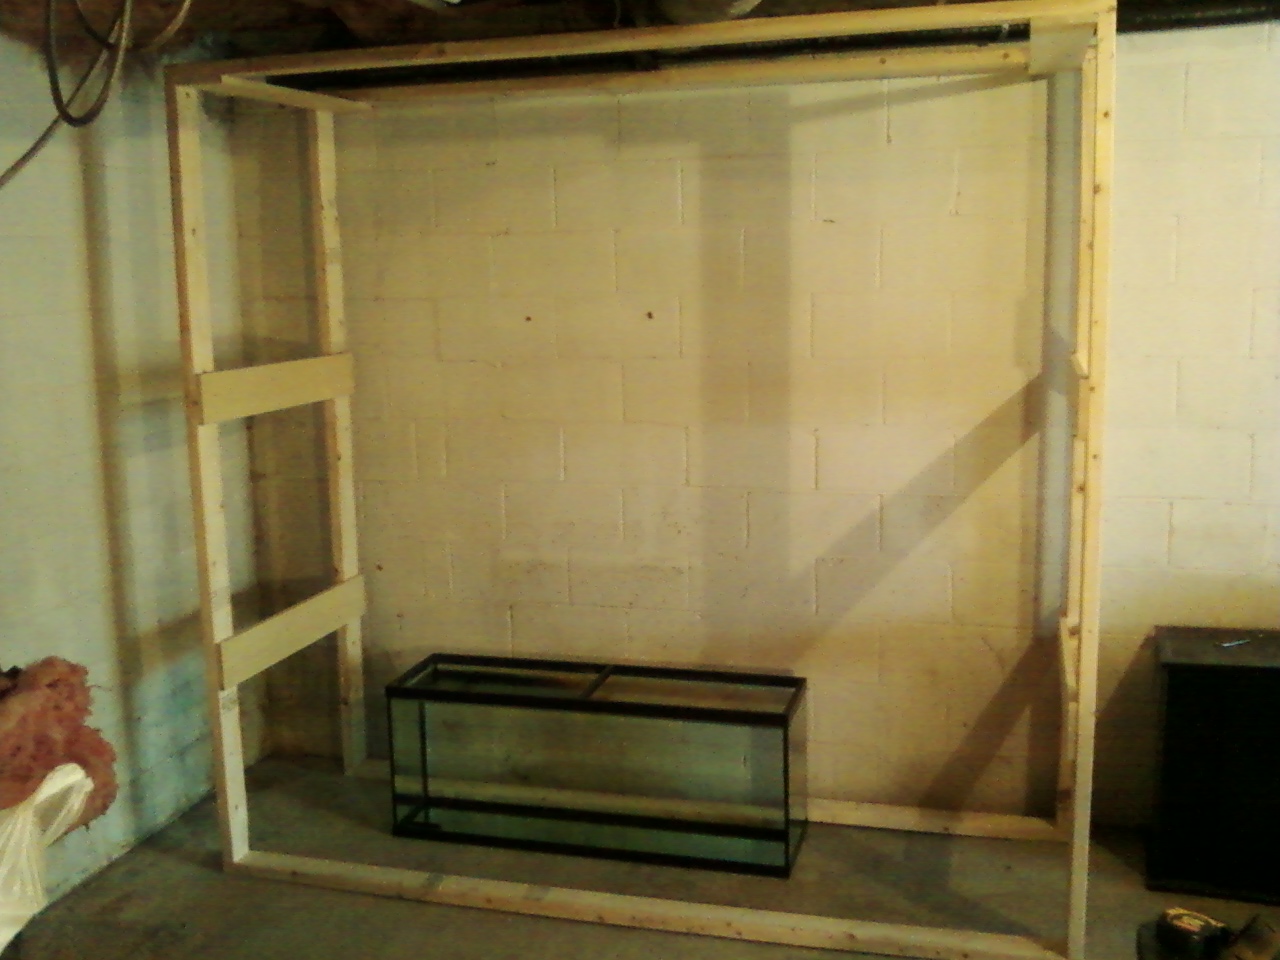
I enjoy gardening at home and hope to use this system as a way to provide fish and produce for my family all year long. Because I will be running this aquaponics system in my basement I will not have to stop gardening because it is winter time or if we are having a very dry season. Aquaponics only uses about 1/10 of the water a normal garden uses.

I hope you will enjoy following along with me as I start my system from scratch and learn along with me.